Understanding the JWT
ជំពូកនេះមិនទាន់ត្រូវបានបកប្រែជាភាសាខ្មែរនៅឡើយទេ — សូមអានជាភាសាអង់គ្លេសខាងក្រោម។
Table of Contents
- Getting a Real Token
- JWT Structure
- Decoding It
- The Claims That Matter
- Authentication vs Authorization, Revisited
- Beginner Pitfalls
1. Getting a Real Token
Using the meng user and nestjs-api client from
Part 4:
curl -X POST http://localhost:8080/realms/crash-course/protocol/openid-connect/token \
  -d grant_type=password \
  -d client_id=nestjs-api \
  -d username=meng \
  -d password=<meng's password>
The response's access_token field is a real Keycloak-issued JWT —
that's what the rest of this part decodes.
Note: this is the password grant mentioned in Part 5 — a
curl-friendly shortcut for this crash course's demo, not the Authorization Code flow a real frontend uses.
2. JWT Structure
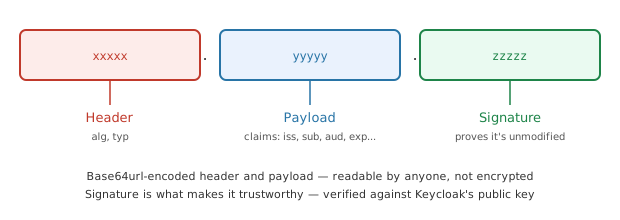
A JWT (JSON Web Token) is three base64url-encoded segments, joined by dots:
xxxxx.yyyyy.zzzzz
  │      │      │
Header Payload Signature
- Header — algorithm and token type
- Payload — the actual claims (the data described in §4)
- Signature — computed over the header and payload using Keycloak's private key, and verifiable by anyone holding the matching public key
Note: the header and payload are encoded, not encrypted — anyone with the token can read them. The signature is what makes the token trustworthy: it proves Keycloak issued it and it hasn't been tampered with, not that its contents are secret.
3. Decoding It
Split on . and base64-decode the first two segments:
echo '<payload-segment>' | base64 -d | python3 -m json.tool
Or paste the whole token into jwt.io — it decodes and displays all three segments (but never paste a production token into a third-party site).
4. The Claims That Matter
| Claim | Meaning |
|---|---|
iss | Issuer — which Keycloak realm issued this token |
sub | Subject — the user's unique ID |
aud | Audience — which client(s) this token is valid for |
exp | Expiration — Unix timestamp after which the token is invalid |
iat | Issued at — Unix timestamp of when the token was created |
preferred_username | The username (meng, in our case) |
realm_access | Realm roles assigned to the user |
resource_access | Client-scoped roles, keyed by client ID |
Every check a backend performs in
Part 7 reads
directly from this table: signature, iss, exp, and aud for
validating the token, then realm_access.roles for authorizing
the request.
5. Authentication vs Authorization, Revisited
The preferred_username and realm_access claims are the concrete
version of the distinction from
Part 1:
{
  "preferred_username": "meng",
  "realm_access": {
    "roles": ["user"]
  }
}
- Authentication — "Who are you?" →
preferred_username: "meng" - Authorization — "What are you allowed to do?" →
realm_access.roles: ["user"]
One token answers both questions — which is exactly why Part 7 can build both a token-required route and a role-required route from the same JWT.
6. Beginner Pitfalls
- Trusting a token without checking
exp. A JWT doesn't become invalid on its own once decoded client-side — the validator (your API) must check expiration itself. - Assuming the payload is secret. Never put sensitive data in a custom claim expecting it to stay private — anyone holding the token can read the payload.
- Skipping signature verification. A decoded-but-unverified token is just untrusted JSON someone could have handwritten — verifying the signature is what actually proves Keycloak issued it (see Part 7).
ទិញកាហ្វេជូនខ្ញុំ
ចូលចិត្តមេរៀននេះមែនទេ? សូមពិចារណាទិញកាហ្វេជូនខ្ញុំមួយកែវ ដើម្បីគាំទ្រការបង្កើតមាតិកាឥតគិតថ្លៃបន្ថែមទៀត!